How to Create Categories in Discord

Discord rolled out back in 2015, but the platform gained popularity earlier in 2020, with the pandemic outbreak.
The reason behind this is evident - people found a way to communicate and stay in touch according to what was possible at the time.
However, this doesn’t necessarily mean that Discord only became popular due to the pandemic.
The platform is actually tailored so well that there are companies that are switching to Discord, and leaving extremely popular apps such as Slack or Microsoft Teams.
How the platform works is, each virtual space is based on a server. The servers have separate channels, you can contact members of the channels individually, and have calls to talk directly.
However, with so many channels and servers, it can get confusing. Therefore, adding Categories to your Discord servers is the optimal solution in order to stay organized.
Adding a channel category on Discord
As we mentioned, organizing your channels into categories is the best solution to keep track of the purpose of each individual one.
Bonus: Learn how to make an Announcement channel on Discord.
To add a channel category from Desktop/Web, follow these steps:
- Open the Discord app/website, and log in to your account.
- Open the server you want to make changes to.
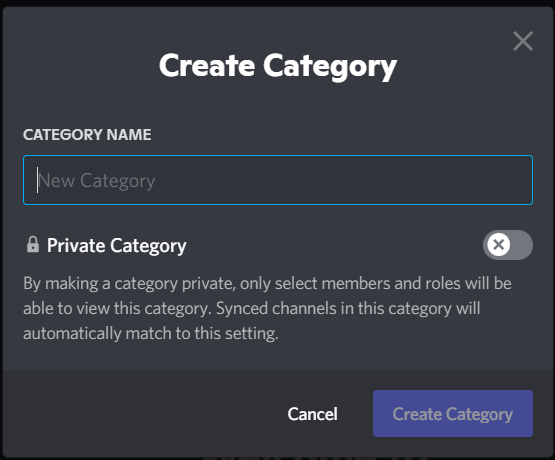
- Click on the server name in the upper-left corner, and click on ‘Create Category’.

- In the pop-up, type in the name of the category, and click ‘Create Category’ in the lower-right corner.
After creating a new category, you can add one or multiple channels to the category by dragging them to the category.
Another option for you to choose from is whether you want the category to be ‘Private’ or ‘Public’.
To add a channel category from the mobile app, follow these steps:
- Open the Discord app, and sign in using your credentials.
- On the following page, click on the hamburger menu in the upper-left corner.
- Tap on the server you want to make changes to.
- A list of options will show up from the drop-down menu; click on ‘Create Category’.
- In the pop-up, type in the name of the category, and click the checkmark in the upper-right corner.
After creating the categories on the mobile app, you won’t be able to move existing channels to the new categories, you will have to log in from the desktop/website version.
To manage the category and notifications from the mobile app, tap and hold on the name, select ‘Edit Category’ and open the Permissions section.