How to Make and Edit a Screenshot on Mac OS X

Do you identify yourself as a Mac desktop user and you want to learn the dynamics of how to take and edit screenshots on your Mac OS X? It doesn’t matter if you are a new Mac OS X user or just a regular Mac desktop one, the screenshot features on the Mac OS X PC, as the tenth major version of Apple’s operating system for Macintosh computers offer multiple variations on how you can do a screenshot.
Here, we’ll run through the multiple key combos and refinements on how you can make screenshots, how to properly crop them, and also how to take a screengrab of an area that is larger than your screen.
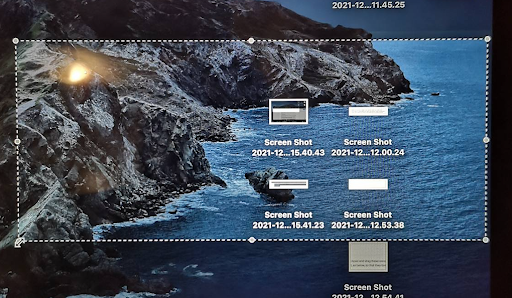
Reminder: The screenshots that you take on your Mac are saved on your desktop by default, however, you may customize where you want them to be saved.
Which buttons can take a screenshot on Mac OS X
Actually, there are several methods that you can utilize in order to make a screenshot on a Mac. Stay tuned to learn which are those buttons.
If you want to make a screenshot of the whole screen, these are the buttons to press
(Command + Shift + 3).
In case you have more than one screen, this screenshot feature will be able to grab two screenshots, one of each screen that you have and they will be saved to your Mac desktop by default.
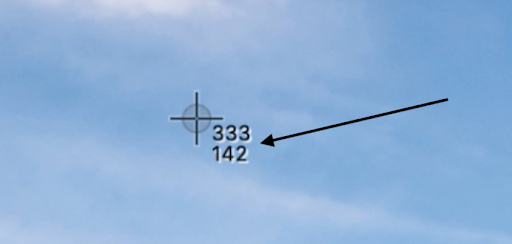
If you want to make a screenshot of a certain area of your Mac screen, this is the best option to do it (Command + Shift + 4).
Press Command + Shift + 4 and you will notice crosshairs on your screen with some numbers around it.
Click with your mouse on the crosshairs and drag them across the area that you want to take a screenshot from. Once you drag and form a rectangular form around what you want to grab, you are on the good road. Though, the form of the screenshot that you take, can also be in a square form as well.
After that, you need to release the button of your mouse and you will see that your screenshots are saved automatically on your Mac desktop.
In addition, if you prefer your screenshot to be of particular dimensions, you can use the pixel measurement that shows up beside the crosshairs.
For instance, if you want to make a square form, you can drag the crosshairs until the dimensions are 500 x 500.

If you are interested in more options for making a screenshot on Mac OX S, the way to do it is via Command + Shift + 5.
This screenshot feature came in Mojave and you will be able to use it if you have the updated operating system since 2018.
With the press Command + Shift + 5 screenshot option a pop-up window will appear on your screen, giving you a number of options for you to try out. These include: Capture Entire Screen, Capture Selected Window and Capture Selected Portion.
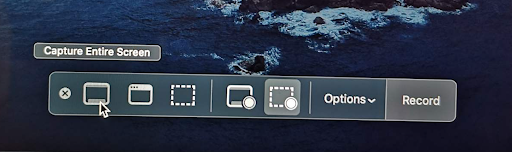
Another interesting feature is that you can make a screen recording of what is happening on your screen. This can be utilized by Record Entire Screen and Record Selected Portion.
Bonus: Learn how to delete Screenshots on Mac.
Can I edit screenshots in Mac OS X
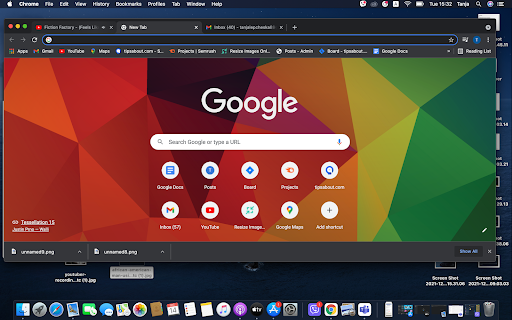
Sure you can. Recent versions of Mac OS X are great because they allow you to edit screenshots even without opening an application. For example, when you make a screenshot, a thumbnail will show up in the bottom right corner of the screen.
Once you click on that, the image will open in this option known as Quick Look which gives you the opportunity to draw, add shapes, highlight, text boxes and also add your own signature to the screenshot. How amazing is that?!
In case you forget to click on the thumbnail, you can also open and edit the screenshot in the Preview app. All you have to do is click on the screenshot that is on your Mac desktop and press the Spacebar, in order to open the Quick Look view that allows you to make edits without opening the Preview app.
How to get Mac OS X editing tools
If you want to access the editing tools on Mac OS X, these are the things you need to follow:
- Open the screenshot image.
- One way to open the screenshot for editing is by double clicking on the screenshot file on Desktop, then selecting the file and pressing the Space bar.
- Another way is by clicking on the thumbnail that shows up once you take the screenshot itself.
- On the top of the window that appears, you will notice options such as Open with Preview and you do not have to open the screenshot image in Preview but you can get the tools by clicking on the pencil icon.
- Once you click on the pencil icon you will access multiple options for editing the screenshot you took.
Can I crop a screenshot?
Several methods are available for you to crop a screenshot on Mac OS X. Here are only 3 simple steps to follow:
- In accordance with the instructions given above, open the editing features.
- Next, click on the Crop icon. Once you do that, a button marked as Crop will appear where you need to click and drag the white corners at the edge of the screenshot image.
- When you have the desired cropping form, click Crop.
Tips for Mac desktop screenshots
Tip 1: Once the crosshairs appear you can let go of the keyboard keys.
Tip 2: Once you've clicked the mouse button and started dragging the cursor, press Space. Then you'll be able to move the selected area around.
Tip 3: Hold Shift and you'll be able to move horizontally only.
Tip 4: Press Escape at any time to abort the screengrab. No image will be generated or captured.
Tip 5: When you press Control at the same time the screenshot will be copied to your pasteboard.
Explore how to fix if AirPods can't connect to Mac.