How to Record Screen on Mac with Audio
-(2)-profile_picture.jpg)
Most of us have had the need to record the screen on our Mac whether it was for a presentation for school or work, recording a gaming session, online class, or creating tutorials.
Fortunately, Mac OS comes bundled with QuickTime Player - a free application for recording audios and videos on your laptop. The latest version QuickTime X is available for all versions of Mac OS from Mac OS X Snow Leopard up to macOS Mojave.
If you need to make a screen recording with audio or you need to record your screen for educational purposes when media is being played, this guide will walk you through the steps of how you can set up the video and audio settings in the recorder.
How to record your screen on Mac with audio with QuickTime
You can use QuickTime Player to make a video recording of the entire screen or just a selected portion of it.
To record your Mac’s Screen with both audio and video:
- Open the media you want to screen capture, or set up your screen in the application you want to record. If you are using a browser, use Firefox or Chrome, not Safari.
- Depending on the iOS version, you can access the QuickTime Player in two ways:
- Access it through the Screenshot toolbar by pressing these three keys together: Shift, Command and 5.

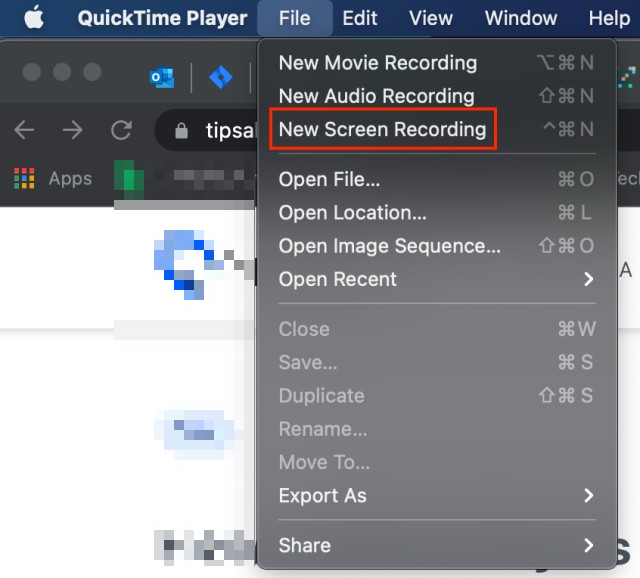
- Or go to Applications on your Mac or go to Finder file manager and type in “QuickTime Player” to find the recorder. Then go to File > New Screen Recording from the menu bar.
- Either way you open the recorder, on the screen you’ll see onscreen controls offering the option to record the entire screen, or record a selected portion of the screen. Choose the option that fits you best.

- Depending on the iOS your Mac is using, you may also get a Screen Recording window as presented below instead of the onscreen controls.
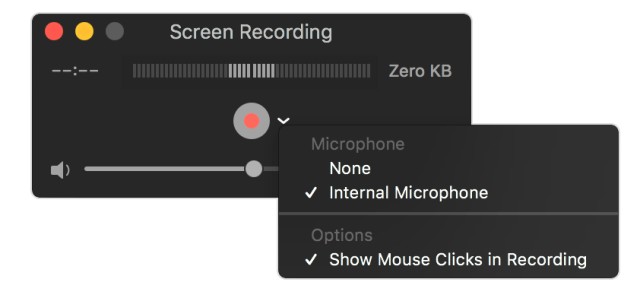
- Before you start recording, you can click on Options next to the Record buttons, or the arrow next to the Record button to change the recording settings, such as Save to - where to save the recording, Timer - whether you want to have a timer, Microphone or other options such as Show Floating Thumbnail, Remember Last Selection and Show Mouse Clicks, from top to bottom on the options list.

- To record your screen with audio, go to the Microphone section in Options, and select one of the available microphone options.
- If you want the recording to have a black circle around your pointer when you click, choose Show Mouse Clicks.
- To start recording, either click on the Record button. When the recording starts, you’ll see a Record icon (a circle with a square inside) in the top-right menu bar of your Mac screen.
![]()
- To stop recording click on the Record icon in the menu bar or press Command-Control-Esc (Escape).
- After you've stopped recording, QuickTime Player will open the recording automatically. Now you can now play, edit or share the recording. You will also find your recording saved in the location you have chosen in the Options.
How to record screen on Mac with audio with iMovie
Another great Mac-native tool for screen recording with audio, which is also suitable for beginners is iMovie. If you don’t have it installed on your Mac, head over to the App Store, and download and install iMovie.
To start recording your Mac screen with iMovie:
- Launch the iMovie application.
- In the top-left menu bar, go to the File option and click on New Movie.
- Click on Import Media and choose FaceTime HD Camera.
- Click on the red record icon to start recording.
- With iMovie, you automatically have the option to also record audio by using the built-in Mac mic or plugged-in headphones with a microphone. You just need to make sure to turn the volume up during screen recording so iMovie can also record the audio.
- To stop recording, just click the red record icon again.
- Click on Save to save the recording to your device.
iMovie is super convenient if you are making an instructional video, and you want to record your screen, audio and yourself speaking to make a more engaging video. The video recording tool enables you to overlay video of your face as you explain the screen recording.
To learn how to do this you can watch the video tutorial below
Learn also how to pause FaceTime on iPhone or Mac. If you are concerned about your camera safety, explore how you can lock your MacBook camera and restrict access to some apps.
.jpg)